Control who can see your Teams recordings
Recordings are held in Teams for seven days then available through Stream, Microsoft’s video sharing app. Read this guide to make sure your videos are only shared with those you intended.
Stream is like Microsoft’s version of YouTube. It only contains University content and no one outside the University can access it – even guests in Teams. In Stream, there’s a ‘Discover’ area where you can browser org-wide videos. This makes it a great platform for sharing org-wide updates, event recordings or training videos. Read this guide to make sure you or your recordings aren’t featured there unintentionally.
Why your video would appear on Stream
- You’ve recorded a meeting which has taken place in a public team.
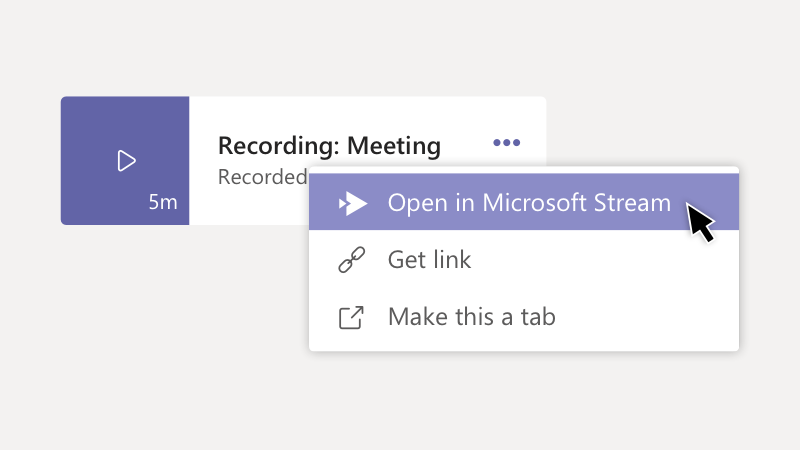
- You’ve shared your video from within Teams, rather than Stream. This means you have clicked the … and select ‘Get link’ rather than ‘Open in Microsoft Stream’ to change the video permissions.
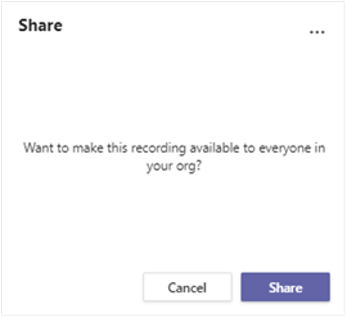
When you select ‘Get link’, a further pop up appear which asks whether you’d like to share this with the entire org.
1. Use a private team
If you’ve set your Team up as public rather than private, everyone in the organisation can see the meeting recordings which are hosted in the Team channels.
There are two privacy settings when you create your Team:
- Public, which means anyone in the organisation can see your Team chat and files, including meeting recordings
- Private, which means only you and its members will know it exists and be able to see the content
IT Services also contact the owners of public Teams when they’re set up to confirm this was their intention so they can change the privacy setting if needed.
Tips for tutors
If your tutorial Team was set up by IT Services, it’ll be private.
If you set yours up yourself and didn’t change this setting when creating your Team, it will be private by default.
2. Restrict your participant settings in Teams meetings
To stop one your attendees recording and sharing the meeting that you have organised, restrict what they can do during a meeting. This is only available for scheduled meetings rather than those using Meet now.
By default, anyone in the meeting has the option to ‘Start recording’. If you’d like to turn this off so that no one can record but you, change the Meeting Options. This isn’t supported on Safari at the moment so use Chrome on a Mac.
There are two ways to get there:
- In Teams, go to Calendar
 , select a meeting, and then Meeting options.
 -
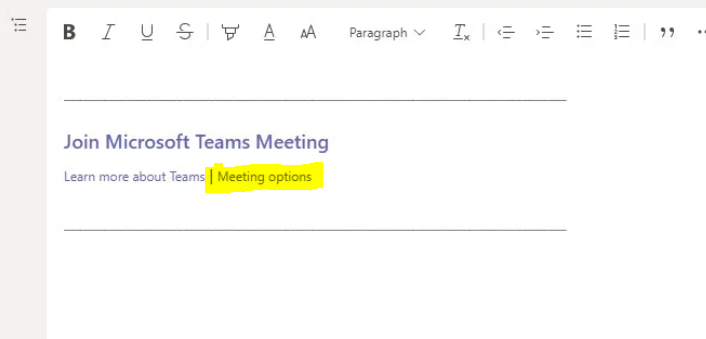
In a meeting invitation, select Meeting options.
Then change Who can present. When you choose ‘Only me’, it means that during the meeting, you’re the only one that can:
- mute participants
- remote participants
- start and stop a recording
- share your screen or any other content
- admit people from the lobby
- download the recording afterwards
Read more about this in Microsoft’s guide to roles in meetings.

It’s important to note that these settings are only applied to a single meeting. If you have a reoccurring meeting, the settings will need to be re-applied to each one.
Tips for tutors
Adjust this setting for your tutorials so your students can’t record the session. Despite this setting being applied, your students could still record the session using other means. You may wish to instruct them not to do this as you’ll make your recording available afterwards.
If you would like your students to present and share a PowerPoint during the tutorial, leave the settings as they are.
3. Check your permissions in Stream
Recordings will live in the chat or channel which they were created for 7 days. After this, they’ll only be available in Microsoft Stream.
To get to Stream, open the Office 365 App launcher ![]() , select All apps, and then select Stream, or go to stream.microsoft.com and sign in with your University username and password.
, select All apps, and then select Stream, or go to stream.microsoft.com and sign in with your University username and password.
Select My content > Videos
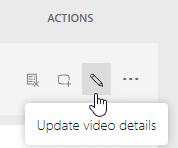
Hover over the video you want to check and select Update video details (it looks like a pencil icon).
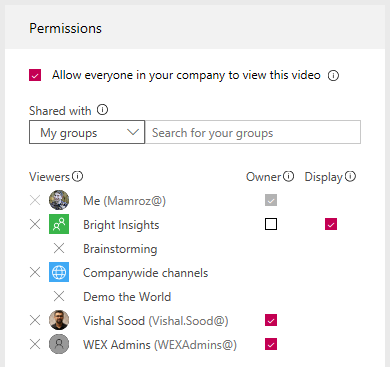
Make sure the Allow everyone in your company to view this video is unticked if it’s private.
Tips for tutors
Make sure that tutorial recordings are only made available to those that attended the tutorial, not the organisation.
In the video details, you can also check who is an owner and who can display the video. Every meeting participant will have access to the recording. If you held the meeting in a Team within a channel, the whole Team will be able to watch it too.
You can also make it available to further individuals and Teams which you’re part of or share a link to the video. Once you’re happy with the settings, it will be available to them through Stream.
4. If you find a video you think should be private
If you don’t know anyone in the video and are confused why you can see it – most likely, the owner of the video has made this available intentionally. There’s no need to panic, Stream is a secure platform which is limited to staff and students. There are over 6000 online meetings going on every week and only a handful of recordings have been made available to everyone to watch. Among these, you’ll find our remote working sessions, latest cyber event and an overview of Skype for Business telephony.
If you’d like to raise it with IT Services to be sure, note the video name and staff/student that uploaded the video and log a call with the IT Service Desk. IT Services do a daily check of public videos to safeguard the privacy of staff and students in case videos have been shared org-wide accidentally. We will update the video description to ‘available to all staff and students’ to show that we’ve checked this was intended.
If you feature in the video, contact the owner of the video and ask if they could change the privacy settings as per above.